Thank you for your Provenza MaxCore™ Waterproof Luxury Vinyl Plank WPC/SPC flooring purchase. MaxCore™ LVP floors are beautiful, durable and backed by industry standard warranty coverage. With proper job site preparation, installation, and routine care and maintenance, your new Provenza MaxCore™ LVP floor will give you years of beauty and function.
Provenza MaxCore™ LVP floors feature an attached underlayment pad and are designed for a floating installation method and can be installed over existing floors provided they meet the subfloor requirements outlined here.
MaxCore™ LVP flooring is intended for interior use only and is suitable for above-grade, on-grade, and below-grade applications. MaxCore™ LVP floors should not be installed in locations where the substrate below the building structure is exposed to the elements or where there are structural problems related to ongoing moisture exposure.
INSTALLER/OWNER RESPONSIBILITY
Please read these instructions and warranty disclosures completely before proceeding to installation!
BY INSTALLING THIS PRODUCT, YOU ASSURE THAT ALL INSTALLATION REQUIREMENTS OUTLINED HERE HAVE BEEN MET AND AGREE TO THE TERMS AND CONDITIONS OF THE PROVENZA MAXCORE™ LUXURY VINYL PLANK LIMITED WARRANTY.
PRODUCT HANDLING, INSPECTION & STORAGE
Always transport and store product cartons carefully to prevent damage to the flooring inside. Cartons should be stored in a climate controlled environment on a flat surface and not upright on their ends or in areas subject to extreme temperatures, including but not limited to, garages, basements, storage containers, sheds, crawl spaces, or attics.
It is the installer/owner’s responsibility to inspect the flooring product purchased. This inspection should include product color, quality, finish and locking system. Provenza Floors™, Inc. will not accept responsibility for the installation of MaxCore™ LVP flooring with visible manufacturing defects or damage.
If the product is not acceptable, DO NOT PROCEED TO INSTALLATION. Do not continue opening cartons and do not discard cartons that were opened during inspection. Contact your retailer immediately for assistance!
JOBSITE PREPARATION
EXTERIOR
Structural damage caused by water and/or high humidity must be resolved prior to installing Provenza MaxCore™ Luxury Vinyl Plank flooring.
Ensure that exterior grading is complete with surface drainage offering a minimum drop of 3" in 10' to direct exterior water sources away from the structure where the flooring will be installed inside.
Crawl spaces should be a minimum of 18" high, insulated per latest building code requirements, with a minimum 6-mil ground cover vapor barrier. Crawl spaces should offer cross-ventilation air vents equivalent to at least 1.5% per 100 square feet of floor space.
INTERIOR
Moisture issues must be detected and corrected before installation. Provenza MaxCore™ LVP floors are waterproof but are not intended for use as a moisture barrier.
The jobsite should be enclosed and climate controlled. HVAC systems must be fully operational with a consistent room temperature of 65°–85° F and relative humidity levels of 35%–55% before the flooring is delivered or installed, and throughout the lifetime of the flooring installation.
Do not install MaxCore™ LVP floors where they will be subject to extreme hot or cold temperatures at any time. Do not install cabinets or heavy fixtures on top of MaxCore™ LVP flooring.
To eliminate potential trade-related damage, Provenza recommends that installation of its MaxCore™ LVP flooring be one of the last jobs completed.
SUBFLOOR CONDITIONS
The quality and preparation of the subfloor is critical to a successful MaxCore™ LVP installation.
ACCEPTABLE SUBFLOOR TYPES
- CDX Plywood.
- Concrete. Minimum compression strength of 3000 PSI.
- OSB/Particleboard.
- Existing resilient tile, sheet vinyl (one layer only) or ceramic tile.
Minimum subfloor requirements for all installations:
- Structurally sound, smooth, clean, and free of debris, including but not limited to, staples, nails, wax, grease, paint, sealers and old adhesives.
- Level and flat to 3/16" per 10'.
- Dry throughout the lifetime of the installation.
Wood subfloor must be:
- Tested for moisture not to exceed 11%.
- Nailed or screwed down every 6" along the joists to remove subfloor squeaking.
- Leveled with high spots sanded down and low spots filled with a leveling compound. Leveling material should provide a structurally sound wood subfloor.
Concrete subfloor must be:
- Fully cured for at least 60-90 days prior to installation.
- Tested for relative humidity, moisture, and pH. Relative humidity tests should not exceed 85% (RH); Calcium Chloride Test for moisture should be no more than 8lbs per one-thousand square feet in 24 hours MVER (Moisture Vapor Emission Rating) and pH tests for alkalinity levels should register between 7 and 9.
- Installed properly with a minimum 6-mil poly film moisture barrier between the concrete and ground below.
When MaxCore™ LVP products are installed over ground level concrete and below-grade applications (concrete or existing floors), a 6-mil poly film must be installed as an additional layer of moisture protection. A concrete sealer can be used as another type of protection. When installing the 6-mil poly film, it should be overlapped 6 to 8 inches using waterproof tape to seal all seams and extended a few inches up the walls.
Improper installation of the 6-mil poly film can result in noise issues such as squeaking, popping, crackling, locking mechanism failure, misalignment of planks and/or damage to the flooring over time. Improper installation is not covered by the manufacturer warranty.
Existing Subfloors
Resilient tile, sheet vinyl or ceramic tile requirements:
- No more than one layer.
- Well secured to structural subfloor.
- Grout lines of any depth should be filled in with a cementitious leveling and patching compound to assure a smooth, flat surface. The leveling compound must be completely dry before installation.
- Do not install over any uneven surface, including but not limited to, tile or pavers.
DO NOT INSTALL MAXCORE™ LVP OVER CUSHION BACKED GOODS OR ANY OTHER FLOORING THAT IS NOT COMPLETELY ADHERED TO THE SUBFLOOR.
Floor coverings that must be removed prior to installation include: Carpet, needle felt, cushion vinyl, floating floors of any kind, parquet, solid and engineered hardwood over concrete, sleeper substrates and pavers with an uneven surface. Do not install over wood flooring glued to concrete.
RADIANT HEAT GUIDELINES
Please be advised that all Provenza MaxCore™ LVP flooring products can be used with embedded radiant heat systems. This includes hydronic water-based systems and electrical resistance systems. It must be noted that the radiant heat system must be embedded into the subfloor (typically wood or concrete, or a layer of mortar) and cannot be in direct contact with the LVP flooring. Direct contact of the radiant heat system with the LVP flooring will cause damage and void all manufacturer's warranty. Prior to installation, the radiant heating system should be operational with the heating temperature set to 68°F 48 hours before, during and 72 hours after installation.
The temperature of the radiant heating system may be increased gradually 72 hours after installation, but the surface temperature should never exceed 85° F.
IMPORTANT NOTE: Provenza Floors requires installing a Class 1 impermeable vapor retarder over the slab in all on- and below-grade applications. Do not use asphalt or Felt or Roofing paper (bitumen-type vapor) retarders over radiant heat systems.
ACCLIMATION
Provenza MaxCore™ LVP floors require acclimation for a minimum of 72 hours prior to their installation. Product cartons should be placed in the area where they will be installed. Do not stack boxes directly on the concrete subfloor. HVAC systems must be fully operational with a consistent room temperature of 65°– 85° F and relative humidity levels of 35%–55%. Remove plastic wrap from flooring cartons if present but do not open the flooring cartons or take out individual planks until acclimation has been achieved and the flooring is ready to be installed. Proper temperature and humidity levels in the installation area are key to the acclimation process.
INSTALLATION
Tools and Supplies needed: Expansion Gap Spacers, Ruler, Pencil, Tape Measure, Utility Knife.
Provenza MaxCore™ LVP floors are designed to replicate the look of a real wood product with natural variations in color, texture, and shade. For optimal visual effect, shuffle planks from several cartons and avoid installing similar planks next to others nearby.
For aesthetic purposes, plank flooring is often laid in the direction of the longest wall. It is the responsibility of the installer/owner to choose which direction the flooring will run before installation starts.
Provenza MaxCore™ LVP floors can be installed in a staggered fashion to achieve an overall random appearance, but other patterns can be implemented and it is the responsibility of the installer/owner to make this decision before installation starts.
Provenza MaxCore™ products are not warranted against squeaking, popping, or crackling. Squeaking, popping, or crackling is possible when installed using floated methods.
STARTING INSTALLATION
Select installation starting point next to an outside wall. This is usually the straightest and best reference for establishing a straight working line.
Establish the working line by measuring an equal distance from the wall at both ends and snapping a chalk line. The distance you measure from the wall should be the width of a full plank. You may need to scribe cut the first row of planks to match the starting wall to establish a straight working line if it is out of square.
Undercut or notch-out door casings to fit the floor thickness by setting a plank piece on the subfloor and using it as a height guide for sawing. Remove door thresholds and base moldings and replace them after flooring installation.
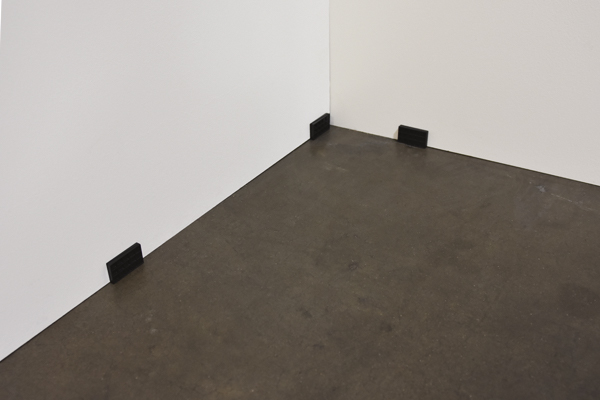
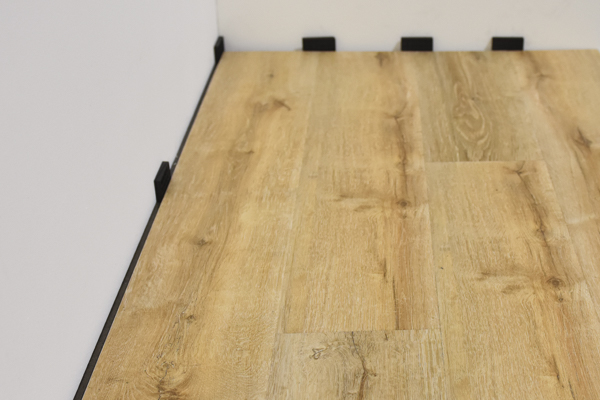
Place ⅜" expansion spacers around the perimeter, including adjacent existing floors or other structures such as hallways, door jams and thresholds. For rooms larger than 50-feet, the expansion space should be increased to ½".
Measure the room at a right angle to the direction of the flooring, calculate number of planks required to fit, and, if necessary, cut plank widths in the first row to a smaller size. The ending row must be a minimum of 2" wide. You may want to position a few rows before starting installation to confirm your layout decision and working line.
Before starting installation make sure the subfloor is clean and free of debris.
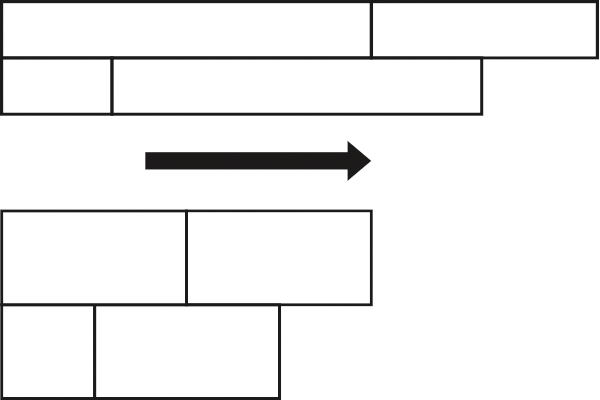
When laying the flooring, ensure that end joints are staggered from each other in adjoining rows. For optimal results, end joints should be staggered a minimum of 15" for plank lengths of 48" to 60" and a minimum of 22" for plank lengths greater than 72". A cut-off piece can be used for starting the next row provided it is at least 15" long, otherwise discard it and cut a new random length plank of at least 15 – 22" as applicable.
Always begin each row from the same side of the room and ensure that the required expansion gap spacers are placed at ends and edges where planks meet the wall. The tongue side of the plank should face the starting wall.
As installation proceeds, cut the last plank in each row allowing for the required expansion space, and continue to check that both the long sides and end joints are fully locked, secure and have not shifted during this process. Continue to check for and clear debris from the subfloor before laying each plank.
During the installation process, the installer/owner should inspect and approve each plank that will be used and avoid placing planks with the same patterns nearby each other.
The installer must use reasonable selectivity and hold out or cut off pieces with defects, whatever the cause. Provenza Floors will not honor claims due to a lack of on-site flooring inspection and acceptance by the installer/owner.
REMINDER: Proper jobsite preparation, subfloor conditions and installation are essential for the longevity of your flooring.
Watch the Uniclic® 4 Sided Lock System Video
 General Installation Instructions
Step 1 - Set Spacers
Create the required expansion space between planks and perimeter walls using ⅜" spacers on short and long ends of plank. For rooms wider than 50', a ½" expansion space is required. Do not remove expansion spacers until installation is complete.
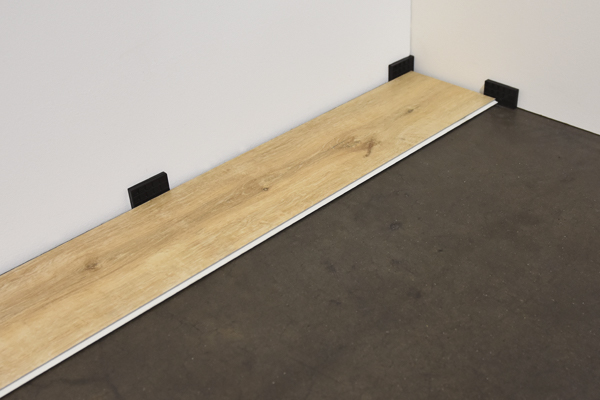
Step 2 - Install first plank
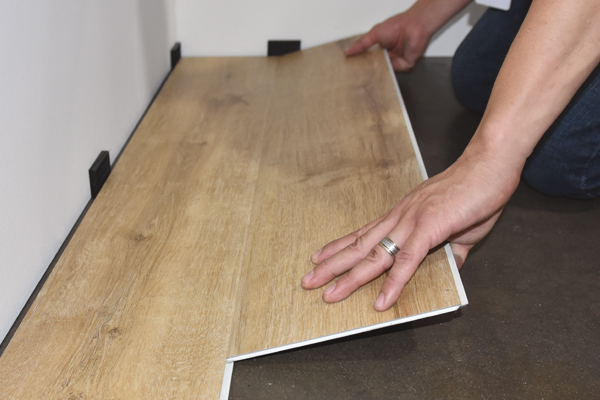
Position the first plank against the ⅜" wall spacers along the starting wall beginning at the corner of the room. Tongue side of plank should be facing the starting wall.
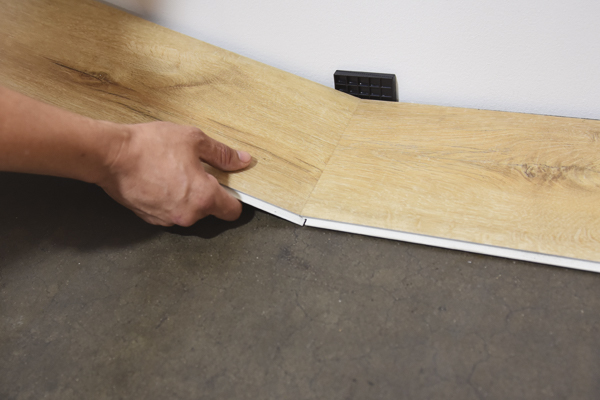
Step 3 – Lock end joints
Install the next plank of the first row, locking short end of plank to the first by inserting tongue into groove at an angle and drop in place.
Continue installing each plank until end of first row is complete. Cut last plank of first row as needed to fit.
Step 5 – First plank, second row
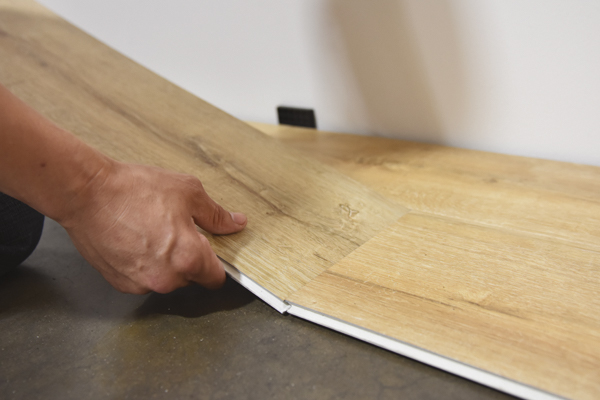
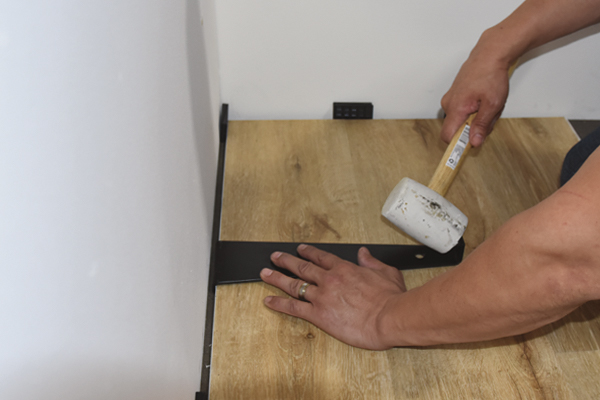
For random length installation, cut the first plank for the second row to one-third its length and insert the long tongue edge of the plank into the long edge groove of the first row plank. Make sure there are no gaps between planks. Use pull bar as needed to close tightly.
Step 6 – Second plank, second row
Insert the short tongue of a new plank into the short groove of the previously cut plank and then insert the long tongue edge of the two attached pieces at the same time into the groove of the first row.
Use the pull bar as needed to ensure a tight fit.
Step 7 – Continue the second row
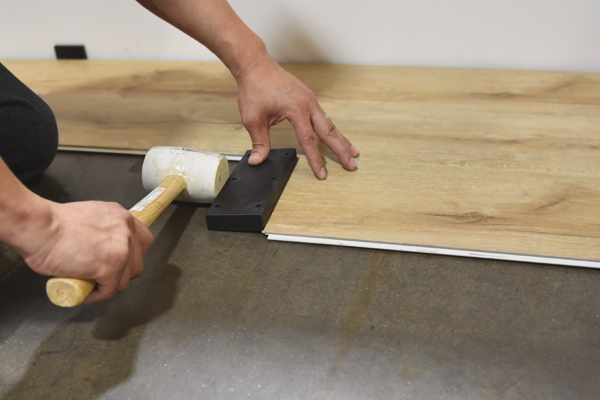
Lock long edge of plank by inserting tongue into groove at an angle and drop in place. Slide plank toward end of previously installed plank until the tongue just touches the groove. Use tapping block gently on short and long edge to ensure a tight fit.
Step 9 – Install remaining rows
Insert the short tongue of a new plank into the short groove of the previously cut plank.
Place the short, cut edge against a spacer and insert the long, tongue edge of the two attached pieces at the same time and continue process until completion.
FINISHING THE JOB
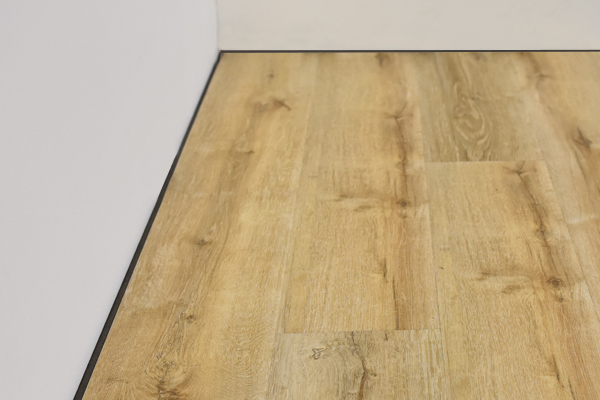
Remove expansion spacers from the perimeter. Install or reinstall baseboard and/or quarter round moldings to cover the expansion space. For bathtubs or showers where standard molding cannot be installed, use flexible caulking in its place.
Install transition pieces such as reducer strips and t-moldings as needed, being careful not to nail or pin them to the flooring underneath. T-moldings are required at all doorways for commercial installations.
Clean and remove all dirt and debris from your new floor by dust mopping or vacuuming.
If needed, cover your newly installed floors with rosin paper to protect them while other trades are working. Clean the floor thoroughly before laying the rosin paper to ensure that no debris is trapped underneath.
DO NOT USE plastic film or other non-breathing coverings as this can cause increased humidity. Overlap rosin paper on long edges and seal with tape to prevent debris from getting underneath. Secure rosin paper at walls by taping to trim, avoiding adhesive tape contact with the flooring surface.
Heavy furniture should be moved onto the newly installed floor using an appliance hand truck over hardboard runways to avoid damaging it.
FLOOR CARE & MAINTENANCE
Provenza MaxCore™ Waterproof Luxury Vinyl Plank floors are durable, but like all interior floor coverings require periodic maintenance to look their best and prevent problems before they occur. The frequency will depend on your lifestyle and traffic on the flooring over time.
Routine/Preventive Care Do’s and Don’ts:
- Sweep, dust mop or vacuum (air suction only) regularly to remove loose dirt and grit. Do not use treated dust mops on MaxCore™ LVP floors.
- Do not use a steam cleaner on MaxCore™ LVP floors.
- Clean up spills or pet accidents immediately.
- Clean using Provenza’s All Purpose Floor Cleaner.
- Do not use harsh cleaners or chemicals, or abrasive scrubbing tools.
- Avoid exposure to long periods of direct sunlight. Close blinds or drapes during peak sunlight hours. MaxCore™ LVP flooring exposed to excessive heat and light is subject to thermal degradation.
- Maintain consistent room temperature of 65°–85° F and relative humidity levels of 35%–55% at all times.
- Do not expose MaxCore™ LVP floors to temperatures exceeding 110° or temperatures below 32° F.
- Do not expose MaxCore™ LVP floors to acetone or other harsh chemicals such as oil or petroleum-based products. Do not track asphalt-driveway sealer or automobile oil onto MaxCore™ LVP floors.
- Ensure that chairs or furniture with casters or wheels are easy swiveling with large surface non-staining casters and suitable for resilient floors use. Do not use ball type casters as they can damage the floor.
- Protective mats and chair pads are required under office chairs or furnishings with rolling casters.
- Ensure that frequently moved furniture is protected with felt pads to avoid scratching the floor. Heavy furniture and appliances should be equipped with non-staining large surface floor protectors. Use floor protectors under furniture.
- Use walk-off mats at entrances to prevent dirt and grit from being tracked on to the floor.
- Protect flooring in the kitchen area with a high-quality rug in areas subject to hot oil spills or splatter.
- Use non-staining mats only. Rubber-backed mats may discolor the floor.
- Do not use electric brooms with hard plastic bottoms without padding as these may damage the flooring.
GENERAL TERMS AND LIMITED WARRANTY COVERAGE
LIFETIME LIMITED RESIDENTIAL WARRANTY
15 YEAR LIMITED COMMERCIAL WARRANTY
(RESIDENTIAL AND COMMERCIAL WARRANTY TERMS ARE IDENTICAL EXCEPT DURATION)
This warranty document covers Provenza MaxCore™ flooring when applied in a residential setting. Provenza MaxCore™ flooring must be professionally installed pursuant to the installation guidelines as herein stated by a licensed certified flooring contractor to validate this warranty. No exclusions or exceptions will be made to this clause.
This warranty covers the cost of material (prorated) for the period of the warranty stated. PRORATION SHALL COMMENCE FROM THE DATE OF PURCHASE AND NOT THE DATE OF INSTALLATION. The manufacturer reserves the right to repair any floor and/or obtain the services of a professional to conduct repairs or replace flooring. The manufacturer reserves the right to inspect any floor that is deemed by the client to be defective. Removal of the flooring prior to this inspection voids this product warranty in its entirety. The manufacturer at its sole discretion will send a company representative and/or a third-party, independent inspector to the installation site to conduct the inspection. If it is deemed necessary, destructive testing as part of the inspection will be conducted to properly facilitate a full investigation.
Closeouts, seconds, and cash-n-carry sales are not covered under this warranty.
This warranty states that Provenza MaxCore™ flooring will be free from manufacturing defects for the term stated above. Should a problem attributable as a manufacturing defect develop after the flooring is installed, the manufacturer will verify the validity of the manufacturing defect. Upon determination of a manufacturing defect, the manufacturer will authorize a credit based on the original purchase price paid by the dealer/distributor for the product to the manufacturer.
This Limited Warranty only applies to MaxCore™ LVP floors that are installed and maintained according to the current Provenza MaxCore™ Luxury Vinyl Plank Guidelines.
Pre-Installation
Provenza Floors warrants that its flooring is free of visual defects. You and/or your installer should carefully inspect each piece before installation. Any pieces that appear to have defects should not be installed. Provenza Floors will not be responsible for any claim for flooring installed with visual defects. Please refer to Provenza MaxCore™ pre-installation/installation guidelines for more information.
Provenza MaxCore™ products are not warranted against squeaking, popping, or crackling. Squeaking, popping, or crackling is possible when installed using floated methods.
Installation
This Limited Warranty covers materials and fair market-value labor if professional installation was paid for when the flooring was originally installed provided that such flooring is installed according to Provenza MaxCore™ Luxury Vinyl Plank Guidelines.
These guidelines are updated periodically and MaxCore™ LVP floors must be installed according to the current guidelines at the time of installation. See provenzafloors.com for the latest MaxCore™ Luxury Vinyl Plank Guidelines.
Wear Layer
The Company warrants the Provenza MaxCore™ floor product will not wear-through to the pattern/decor layer under normal use during the period of this warranty. Normal use is defined as light to moderate foot traffic. The wear layer warranty covers the cost of material, which shall be prorated (please see Proration of Residential Warranties as set forth below) for the period of the warranty stated. The manufacturer reserves the right to repair any floor and/or obtain the services of a professional to conduct repairs or replace flooring.
“Wear-through” is defined as a complete loss of the wear layer that has altered the printed pattern. Gloss change is not considered wear-through and is not covered by this warranty.
Terms of Warranty and Replacement/Repairs
Provenza Floors reserves the right to repair any flooring and/or to use its own source to obtain an installer for replacement flooring. If Provenza Floors repairs or replaces any flooring as a result of a warranty claim, you will be required to clear, at your own expense, any items placed over the affected areas subsequent to the original installation.
In the event that Provenza Floors repairs or replaces any flooring covered under this Limited Warranty, this Limited Warranty shall remain in effect with respect to such flooring for a period limited to the remaining eligible duration of the original Limited Warranty.
Replacement of Provenza MaxCore™ flooring will come from current running-line products comparable to the warranted product.
Within Two Years
Claims on defects of this product, as covered by this warranty that are reported in writing within two years of purchase — Provenza Floors will arrange a credit based on the original purchase of the product paid by the retailer/distributor or replace the product AT ITS SOLE DISCRETION.
After Year Two
Claims on defects of this product, as covered by this warranty, that are reported in writing after two years of purchase and within the specified warranty coverage term — Provenza Floors will arrange a credit based on the original purchase of the product paid by the retailer/distributor or replace the product AT ITS SOLE DISCRETION.
Labor costs are not included. Refer to the Provenza Floors proration tables for details.
If a defect covered by this Limited Warranty is found within the warranty period and reported in writing to the merchant from which the flooring was purchased, Provenza Floors will supply new flooring material of similar color, pattern and quality to replace the defective area.
IMPORTANT! This warranty is not transferable. It extends only to the original owner occupied end-use purchaser. Provenza Floors does not grant to any person or entity the authority to create for it any obligation or liability in connection with this product. Provenza Floors shall not be liable to the consumer or any other person or entity for any incidental, special or consequential damages arising out of breach of this limited warranty or any implied limited warranty (excluding merchantability).
Questions regarding the terms of this Limited Warranty should be directed to customer service at (877) 455-7890. Provenza Floors reserves the right to inspect flooring, request samples, secure photographs or any other information as may be required to ascertain the nature of any claim under this Limited Warranty.
Proration of Residential Warranties
Unless otherwise specified, these limited warranties are prorated, meaning the original warranty value is reduced relative to the length of ownership.
For the 1st and 2nd years, regardless of warranty length, the flooring is covered at full value. Beginning in the 3rd year, the warranty value is decreased based on the remaining years. See proration tables for details on next page.
Lifetime Residential Warranty Proration
Based on an industry-standard 30-year lifespan for engineered hardwood and LVP/LVT products, the following warranty proration table applies:
| 1st – 3rd Year | 100% |
| 4th – 6th Year | 90% |
| 7th – 9th Year | 80% |
| 10th – 12th Year | 70% |
| 13th – 15th Year | 60% |
| 16th – 18th Year | 50% |
| 19th – 21st Year | 40% |
| 22nd – 24th Year | 30% |
| 25th – 27th Year | 20% |
| 28th – 30th Year | 10% |
| End of 30th Year | 0% |
15-Year Commercial Finish Warranty Proration
| 1st – 2nd Year | 100% |
| 3rd – 6th Year | 75% |
| 7th – 10th Year | 50% |
| 11th – 14th Year | 25% |
| 15th Year | 5% |
| End of 15th Year | 0% |
Exclusions
The following are not covered by this Limited Warranty:
- Damage due to improper job site preparation and/or subfloor conditions, installation or maintenance.
- Damage caused by failure to properly align and lock end joints during installation.
- Damage caused by pet accidents.
- Damage caused by excess moisture in the concrete subfloor.
- Damage caused by fire or burns, accidents, intentional abuse, flooding, construction, or installation.
- Damage caused by vacuum cleaner beater bar.
- Damage or indentations caused by improper rolling loads, caster wheels, chairs, or other furniture without proper floor protectors and cuts from sharp objects.
- Surface scratches or scuffing.
- Changes in color or sheen due to exposure to sunlight or the use of rubber-backed mats.
- Exterior or non-flooring applications.
- Squeaking, popping, or crackling is possible when installed using floated methods.
- Color and gloss differences resulting from material added to an existing installation at a later date or from non-warranty repairs are excluded from coverage.
- Gloss change and/or loss of gloss is not considered “wear-through” and is not covered by this warranty. “Wear-through” is defined as a complete loss of the wear layer that has altered the printed pattern.
- Minor shading, color, or texture differences between floor samples, printed color photographs or illustrations and the delivered product.
- Damage due to use of adhesives or tape; exposure to acetone or other harmful chemicals; punctures, cuts, indentations; failure to use protective mats under heavy and/or rolling furniture, including but not limited to, desks, desk chairs, exercise equipment.
- Flooring sold as irregulars or trial grade materials or “as is”.
- Product installed in locations subject to heavy static loads, heavy rolling fixtures, and/or furniture, including but not limited to, areas of recreational, hospital, or rehabilitative activities.
- Product installed in commercial food preparation areas and underneath food preparation tables.
- Improper use of the flooring product to seal an existing floor from moisture. MaxCore™ LVP floors are not intended for use as a moisture barrier.
- This Limited Warranty is void if the required product acclimation process was not completed in accordance with MaxCore™ Luxury Vinyl Plank Guidelines, including maintenance of proper temperature and humidity levels once the flooring is installed.
- Only installation techniques described in this Provenza MaxCore™ Luxury Vinyl Plank Installation Guide are warranted.
- Provenza Floors does not warrant Provenza MaxCore™ LVP installations involving custom cutting, such as 45-degree mitered corners and serpentine edges.
- Loss due to loss of time, inconvenience, incidental expenses (such as telephone calls, labor, and/or materials) incurred in the removal or re-installation of the affected material, and any other incidental or consequential damages.
Provenza MaxCore™ products are not warranted against squeaking, popping, or crackling. Squeaking, popping, or crackling is possible when installed using floated methods.
WARRANTY OWNER
This Limited Warranty applies only to the original purchaser and the original installation site and is not transferable.
Please retain your original flooring purchase receipt. Provenza Floors requires the purchase receipt in order to verify date of purchase to help resolve problems or potential claims.
Manufacturer Inspection Rights and Claims
Provenza Floors™, Inc. shall be allowed a reasonable time to inspect any Provenza MaxCore™ Luxury Vinyl Plank flooring product claimed to be defective.
Claims submitted to Provenza Floors™, Inc. must be supported with the original sales receipt.
In the event of litigation, all controversies shall be submitted to the American Arbitration Association. Venue shall be the County of Orange, State of California.
In the event of any dispute, claim, question, or disagreement arising from or relating to this agreement or the breach thereof, the parties hereto shall use their best efforts to settle the dispute, claim, question, or disagreement.
To this effect, they shall consult and negotiate with each other in good faith and, recognizing their mutual interests, attempt to reach a just and equitable solution satisfactory to both parties.
If they do not reach such solution within a period of 60 days, then, upon notice by either party to the other, all disputes, claims, questions, or differences shall be finally settled by arbitration administered by the American Arbitration Association in accordance with the provisions of its Commercial Arbitration Rules.
CUSTOMER SERVICE & CLAIMS
Internet Sales Policy
The Provenza Floors™, Inc. Manufacturer Warranty applies only when the Provenza MaxCore™ LVP flooring purchase is made directly through an authorized Provenza Floors Retailer.
Provenza Floors products purchased online are not covered by the manufacturer warranty.
Any Provenza flooring sale that has been misrepresented by the retailer/seller, including but not limited to, returns, off-color, or manufacturer defect resale, is not covered by the manufacturer warranty. ANY REPRESENTATIONS MADE BY ANY RETAILER OR DISTRBUTOR WHICH IS IN CONTRADICTION OR NOT COVERED BY THIS LIMITED WARRANTY SHALL NOT BE HONORED BY THE MANUFACTURER.
Claims Process
Claims must be filed by the Provenza Retailer where the flooring was purchased 90 days FROM THE DATE THAT THE DEFECT WAS DISCOVERED OR SHOULD HAVE BEEN DISCOVERED. The claim documentation and original floor purchase receipt should be sent to:
Provenza Floors Warranty Department
15541 Mosher Avenue, Tustin CA 92780
Provenza Floors reserves the right to have a Provenza Floors representative inspect the floor, remove samples for technical analysis and request proof that pre-installation, installation and floor care and maintenance are in accordance with Provenza Floors™, Inc. requirements.
If any portion of your floor should fail with respect to applicable warranty provisions, Provenza Floors™, Inc. will repair, refinish or replace the product at its sole discretion.
If you have questions or concerns regarding your Provenza MaxCore™ Luxury Vinyl Plank flooring, please contact Provenza Floors customer support at: (877) 455-7890.
Save Your Original Receipt!
Save your original purchase receipt to protect your flooring warranty! Document your purchase and save this information for future reference.
Make sure that you save the following information for your records:
- Date of Purchase
- Product Color Name
- Product SKU
- Authorized Retailer Name, Address & Business Phone

PROVENZAFLOORS.COM | CORPORATE OFFICE: (877) 455-7890
Note: This document supersedes all previously distributed Provenza MaxCore™ LVP Uniclic® Installation, Floor Care & Warranty Guidelines and is subject to change without notice. Revision date: 3/7/2025

